Handwritten character recognition by use of ensemble learning.
Last updated Sept. 18, 2022

Handwritten character recognition by use of ensemble learning. Using KNN, random forest, SVM.
In this article, we will explore how to use a machine learning model to try and recognize handwritten digits. we'll be exploring the possibility of using a combination of different models to form an ensemble which will be used to improve the model's accuracy. Ensemble methods in statistics and machine learning use multiple learning algorithms to achieve better predictive performance than any of the constituent learning algorithms alone. In contrast to a statistical ensemble in statistical mechanics, which is typically infinite, a machine learning ensemble consists of only a concrete finite set of alternative models but allows for a much more flexible structure to exist among those alternatives.
A voting ensemble (also known as a "majority voting ensemble") is a machine learning ensemble model that combines predictions from multiple other models. It is a technique that can be used to improve model performance, ideally outperforming any single model in the ensemble. We will use three models in this ensemble where we will institute hard voting to determine the final output.
The models are:
- Support Vector Machine(SVM).
- K-nearest Neighbor(KNN).
- Random Forest Classifier(RFC).
The code used can be found on this GitHub.
It is always good practice to use a virtual environment to house all the dependencies of a particular project so as to keep your global environment uncluttered. We will therefore start by installing a virtual environment for our project:
pip install virtualenv
After successfully installing virtualenv, navigate to the folder in which you want to house the project and open terminal/command-prompt there. Create your virtual environment and name it accordingly:
virtualenv env
A folder with the name env should be created. The environment can be activated through the following command:
if on windows run:
env\Scripts\activate
if on Mac or Linux run:
source ./env/Scripts/activate
You will need to install the following requirements used in the project(These were the latest at the time of writing this article):
asttokens==2.0.8
backcall==0.2.0
colorama==0.4.5
contourpy==1.0.5
cycler==0.11.0
debugpy==1.6.3
decorator==5.1.1
entrypoints==0.4
executing==1.0.0
fonttools==4.37.2
ipykernel==6.15.3
ipython==8.5.0
jedi==0.18.1
joblib==1.2.0
jupyter-core==4.11.1
jupyter_client==7.3.5
kiwisolver==1.4.4
matplotlib==3.6.0
matplotlib-inline==0.1.6
nest-asyncio==1.5.5
numpy==1.23.3
packaging==21.3
pandas==1.4.4
parso==0.8.3
pickleshare==0.7.5
Pillow==9.2.0
prompt-toolkit==3.0.31
psutil==5.9.2
pure-eval==0.2.2
Pygments==2.13.0
pyparsing==3.0.9
python-dateutil==2.8.2
pytz==2022.2.1
pywin32==304
pyzmq==24.0.0
scikit-learn==1.1.2
scipy==1.9.1
six==1.16.0
sklearn==0.0
stack-data==0.5.0
threadpoolctl==3.1.0
tornado==6.2
traitlets==5.4.0
wcwidth==0.2.5
You can copy them into a text file which you'll name 'requirements.txt'. After saving the text file, you can batch install them in the terminal using the following command:
pip install -r requirements.txt
You can run the file in a python file but I'd advise using a jupyter notebook so that you can execute the code step by step and see the results per step.
Create a jupyter notebook and copy the following code in cells as they appear below:
import numpy as np
import pandas as pd
import matplotlib.pyplot as plt
from sklearn.neighbors import KNeighborsClassifier
from sklearn.metrics import confusion_matrix, accuracy_score
import gzip
import random
Run the above cell to confirm you have all the imports working then proceed.
The images used to train the model can be downloaded from the GitHub link provided or from the official MNIST website
def load_mnist(filename, type, n_datapoints):
    # MNIST Images have 28*28 pixels dimension
    image_size = 28
    f = gzip.open(filename)

    if(type == 'image'):
        f.read(16)    # Skip Non-Image information
        buf = f.read(n_datapoints * image_size * image_size)
        data = np.frombuffer(buf, dtype=np.uint8).astype(np.float32)
        data = data.reshape(n_datapoints, image_size, image_size, 1)
    elif(type == 'label'):
        f.read(8) # Skip Inessential information
        buf = f.read(n_datapoints)
        data = np.frombuffer(buf, dtype=np.uint8).astype(np.int64)
        data = data.reshape(n_datapoints, 1)
    return data
# Training Dataset
train_size = 60000
test_size = 10000
dirpath = '' #insert the path to your training images
X = load_mnist(dirpath + 'train-images-idx3-ubyte.gz', 'image', train_size)
y = load_mnist(dirpath + 'train-labels-idx1-ubyte.gz', 'label', train_size)
X_test = load_mnist(dirpath + 't10k-images-idx3-ubyte.gz', 'image', test_size)
y_test = load_mnist(dirpath + 't10k-labels-idx1-ubyte.gz', 'label', test_size)
from sklearn.model_selection import train_test_split
X_train, X_valid, y_train, y_valid = train_test_split(X[:(train_size//10)], y[:(train_size//10)], test_size=0.25, random_state=28)
print(X_train.shape, X_valid.shape, y_train.shape, y_valid.shape)
The output you get from the above cell should be as follows:
use three different models. the K-nearest neighbors, SupportVectorMachine and RandomForest. hard voting ensures that all the classifiers get a say in the final vote.
%%time
#voting classifier- Multiple Model Ensemble
from sklearn.ensemble import VotingClassifier
from sklearn import svm
from sklearn import ensemble

sv = svm.SVC()


print('Training the Model')
knn = KNeighborsClassifier(n_neighbors=5)


rfc = ensemble.RandomForestClassifier()
evc = VotingClassifier(estimators=[('sv',sv),('knn',knn),('rfc',rfc)], voting ='hard')

evc.fit(X.reshape(X.shape[0], 28*28), y.ravel())
The above cell execution will take a while depending on the machine you're running your code on. The above is the training step.
You should also get the following display to show you how the model combines:

Using joblib module, the trained model can be saved. we use the gzip module to compress the trained model so as to reduce its size.
import joblib

joblib.dump(evc, 'evc_model.gzip', compress=('gzip',3))
We have successfully trained our model and saved it in a compressed file.
Now we can use the saved model to perform recognition without having to run all the code above unless we want to retrain it.
We will therefore move to the GUI part of the project. You can append the following code below the existing code or write it to an entirely new file.
Below is the code to implement the GUI. The Tkinter module is the most lightweight graphical user interface module found in python. The pillow module is for manipulation of the inputted images for recognition.
from tkinter import *
import tkinter as tk
from PIL import Image, ImageGrab, ImageOps
import numpy as np
import joblib
The saved model is now loaded for usage in the recognition process.
model = joblib.load('evc_model.gzip')
#the image draw allows the user to draw the digit in the provided space.
from PIL import Image, ImageDraw
#define the color intensities to be used.
white = (255, 255, 255)
black = (0, 0, 0)
window = Tk()

window.title("Handwriting Recognizer")

window.geometry('500x500')

lbl = Label(window, text="Write digits with your mouse in the gray square",font=('Arial Bold',15))

lbl.grid(column=3, row=0)

canvas_width = 120
canvas_height = 120
image1 = Image.new("RGB", (canvas_width, canvas_height),white)
draw = ImageDraw.Draw(image1)
counter=0
xpoints=[]
ypoints=[]
x2points=[]
y2points=[]
global predictions
predictions = []
number1 = []
digits=0

def paint( event ):
    x1, y1 = ( event.x - 4 ), ( event.y - 4 )
    x2, y2 = ( event.x + 4 ), ( event.y + 4 )
    w.create_oval( x1, y1, x2, y2, fill = 'black' )
    xpoints.append(x1)
    ypoints.append(y1)
    x2points.append(x2)
    y2points.append(y2)

def imagen ():
    global counter
    global xpoints
    global ypoints
    global x2points
    global y2points
    counter=counter+1

    image1 = Image.new("RGB", (canvas_width, canvas_height),black)
    draw = ImageDraw.Draw(image1)

    elementos=len(xpoints)


    for p in range (elementos):
        x=xpoints[p]
        y=ypoints[p]
        x2=x2points[p]
        y2=y2points[p]
        draw.ellipse((x,y,x2,y2),'white')
        w.create_oval( x-4, y-4, x2+4, y2+4,outline='gray85', fill = 'gray85' )

    #preprocess the drawn digit so as to increase the probability of getting correct recognition.
    image1 = image1.resize((28,28))
    #convert the image into greyscale
    image1 = image1.convert('L')
    image1 = np.array(image1)
    image1 = image1.reshape(1,28*28)

    #feed the digit into the model for prediction
    predictions.append(model.predict(image1))
    lbl2 = Label(window, text=predictions[counter-1],font=('Arial Bold',20))
    lbl2.grid(column=3, row=10)


    xpoints=[]
    ypoints=[]
    x2points=[]
    y2points=[]


w = Canvas(window,
           width=canvas_width,
           height=canvas_height,bg='gray85')
w.grid(column=3,row=2)
def delete ():
    global counter
    counter = counter-1
    del predictions[counter]
    w1 = Canvas(window,
           width=200,
           height=20,bg='gray95')
    w1.grid(column=3,row=10)


    lbl2 = Label(window, text=answer,font=('Arial Bold',20))
    lbl2.grid(column=3, row=5)
    predictions=[]
    counter=0
def reset():
    global predictions
    global counter
    predictions=[]
    counter=0
    w1 = Canvas(window,
           width=200,
           height=20,bg='gray95')
    w1.grid(column=3,row=10)
w1 = Canvas(window, width=200, height=20,bg='gray95')
w1.grid(column=3,row=10)

w.bind( "<B1-Motion>", paint )
button = tk.Button(window, text='Identify', width=25, command=imagen)
button.grid(column=3,row=3)


button5 = tk.Button(window, text='Reset', width=25, command=reset)
button5.grid(column=3,row=8)


window.mainloop()
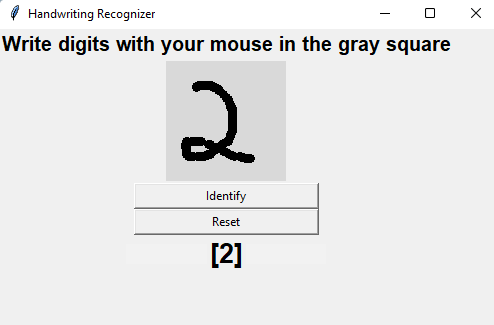
Running the above cell should output the following:

You should then proceed to write in the space provided. Bigger numbers are preferred for better recognition.
Codesville On Youtube
Python, Django, Javascript

